28 February 2019

Avamar - Enable Client Migration Tool

Sometimes you have to migrate clients/ backups to new Avamar grid. To enable migrate on source grid follow below procedure.


On source avamar server make below changes

admin@grid1:~/>: vi /usr/local/avamar/var/mc/server_data/prefs/mcserver.xml

find "migrate"

add line: <entry key="migrate_feature_enabled" value="true" />

example of migrate section

 <node name="migrate">
            <map>
              <entry key="migrate_feature_enabled" value="true" />
              <entry key="src_driven_migrate" value="true" />
              <entry key="migrate_enabled" value="true" />
              <entry key="clients_only_in_workorders" value="false" />
              <entry key="secured_port_offset" value="2000" />
              <entry key="migrate_sched_priority" value="0" />
              <entry key="num_members_per_workorder" value="-1" />
              <entry key="internal_accounts" value="AVI_BACKUPS,EM_BACKUPS,MC_BACKUPS,EBR_BACKUPS" />
              <entry key="encryption" value="high" />
              <entry key="base_port" value="27000" />
              <entry key="internal_account_repl_window_sec" value="300" />
              <entry key="migrate_window_hours" value="24" />
              <entry key="parent_cancel_job_priority" value="6000" />
              <entry key="migrate_adhoc_priority" value="5000" />
            </map>
          </node>

restart mcs

admin@grid1:~/>: mcserver.sh --restart

start scheduler

admin@grid1:~/>: dpnctl start sched


23 February 2019

How to decript Avamar passwords

If you forgor all your Avamar software password you can follow below steps to recover them.
This do not apply to Avamar OS passwords like root & admin.

Decript Avamar passwords

/usr/local/avamar/bin/mccipher decrypt --all
grep AP /usr/local/avamar/var/mc/server_data/prefs/mcserver.xml

root@grid-01:~/#: grep AP /usr/local/avamar/var/mc/server_data/prefs/mcserver.xml
                <entry key="backuprestoreAP" value="backuprestore1" />
                <entry key="backuponlyAP" value="backuponly1" />
                <entry key="MCUSERAP" value="MCUser1" />
                <entry key="replonlyAP" value="replonly1" />
                <entry key="restoreonlyAP" value="restoreonly1" />
                <entry key="rootAP" value="AvamarRootPassword" />
                <entry key="viewuserAP" value="viewuser1" />

Remember to encript the Avamar passwords

/usr/local/avamar/bin/mccipher encrypt --all 

14 February 2019

Upgrade Cohesity Software


1. Go to Cohesity download page and

  • Copy link to upgrade package, or
  • Download upgrade package to local hard drive


2. Login to Cohesity Web UI, go to "Admin" -> "Upgrade Cluster"


3. Click "Get New Package", then you have 2 options:

  • Provide download link to upgrade package


  • Upload upgrade package from local hard drive


Then click "Get Package and Upgrade"

4. Page will refresh automatically, you can click "Show Subtask" to monitor upgrade progress


If you upgrade single node Virtual Coheity it will be unavailable for few minutes, on multi-node clustered Cohesity, one node will be upgraded at a time and you still will be able to use it as normal.
On one point you will be logged out to to refresh the Web UI

5. Refresh web page and login to Cohesity Web UI, go to "Admin" -> "Upgrade Cluster" to confirm new software has been installed


Cohesity Virtual Edition - expand disk capacity

If you run out of space on your virtual Cohesity below are steps which allow you to extend its capacity.

1. In Cohesity Web UI you can see capacity 534.6 GB


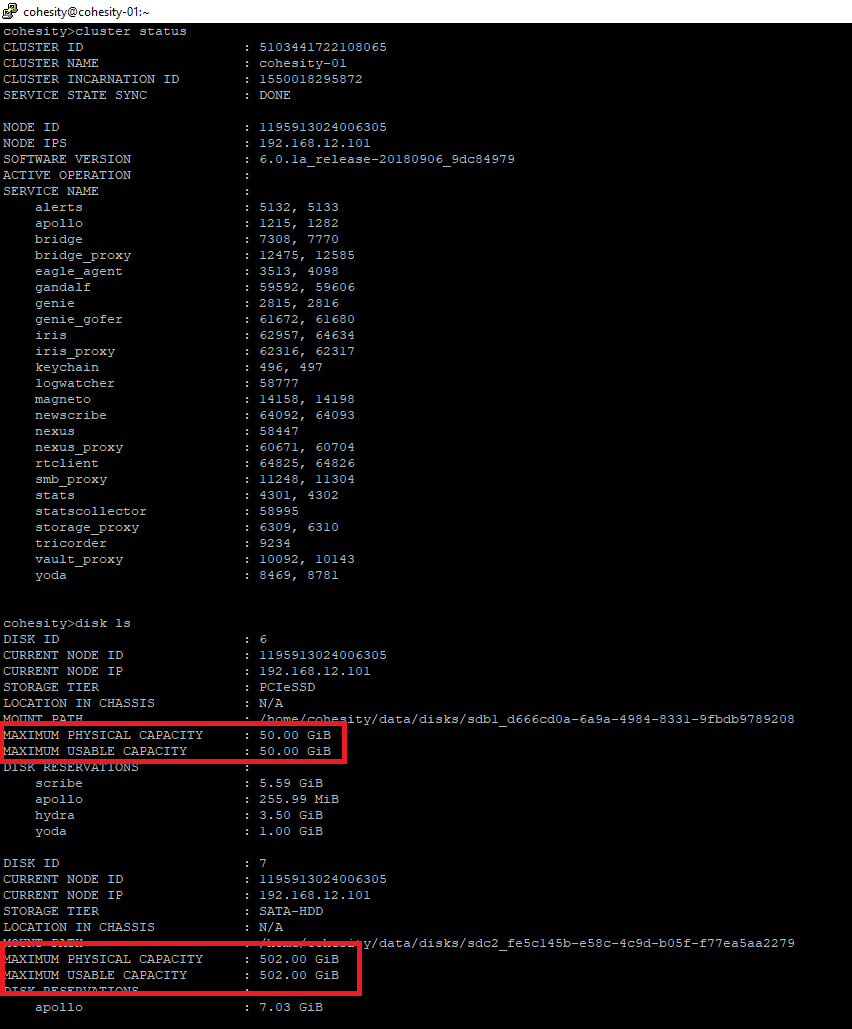
2. SSH to the Cohesity, switch to iris_cli and run: "disk ls" to determine disks size, as you can see we have 50 GB metadata disk and 502 GB data disk


3. Login to ESX or vCentre server and confirm current drives size


4. Expand "Hard Disk 2" metadata disk form 50 to 70 GB and "Hard Disk 3" data disk from 512 to 1024 GB, then restart Cohesity appliance to ensure it can properly recognize the drives new size.


5. SSH to Cohesity, switch to iris_cli, run:

  • disk ls - make note of "CURRENT NODE ID"
  • disk extend node-id=CURRENT_NODE_ID
Now wait few minutes to allow system to expand disks


6. Run "disk ls" to confirm drives have new sizes as expected


8. Run "cluster restart all-services=true" to allow Cohesity to utilize new capacity


9. While all services are restarted login to Cohesity Web UI to confirm new available capacity


Deploy Cohesity Virtual Edition


1. Login to Cohesity support portal and download OVA file


2. Deploy Cohesity OVA to your ESXi / vSphere environment


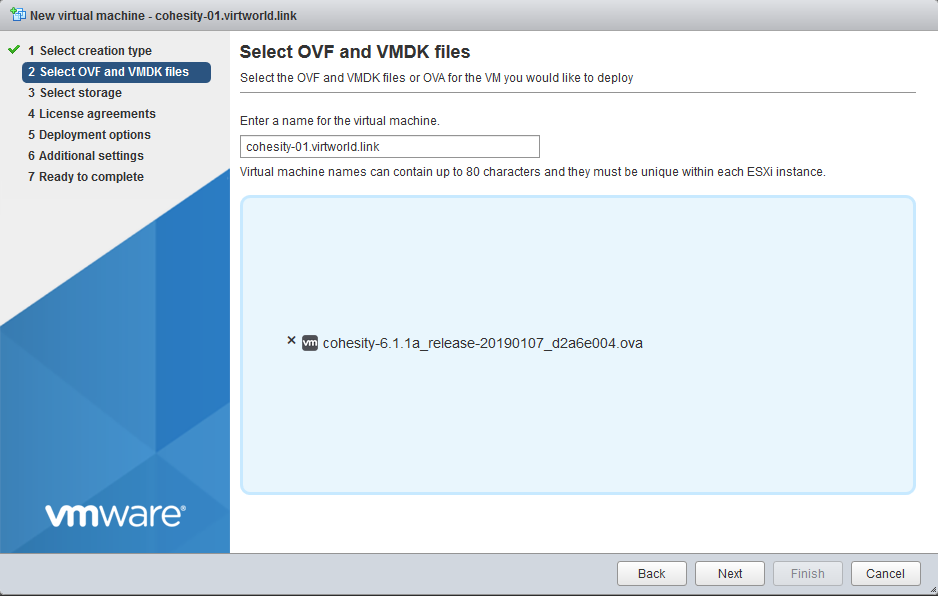
3. Give it a name and choose OVA file


4. Choose datastore for Cohesity OS drive


5. Choose network the Cohesity should be connected to


6. Configure Cohesity initial IP settings


7. Click Next to deploy Cohesity appliance

8. Edit appliance configuration and add 2 hdd, one for metadata (best on SSD datastore) and second for data (max 20 x metadata drive size)


9. If you deploy Cohesity appliance to ESXi host IPs will not be applied and you have to do it manually. Open Cohesity appliance console, login as admin/admin, you have to put the credential twice, then run below commands:

cohesity>cluster status
Error: Node having ID 1195873274425422 is not part of a cluster

cohesity> node configure-network node-ips=192.168.12.101 subnet-mask=255.255.255.0 subnet-gateway=192.168.12.1 node-ids=1195873274425422

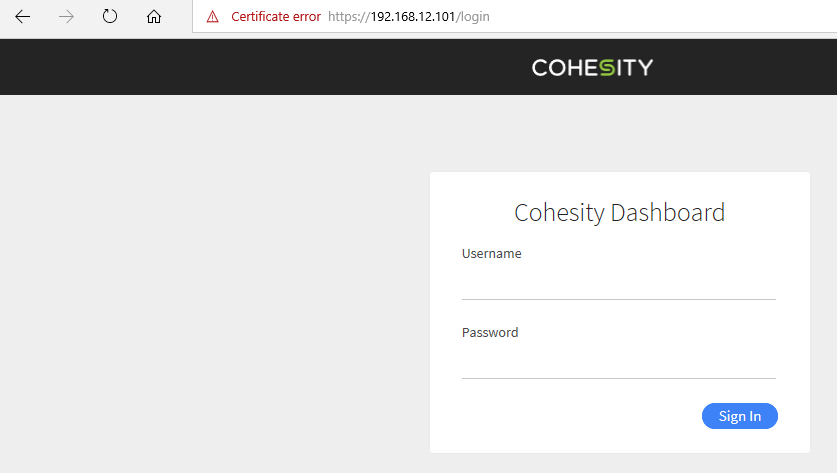
10. Login to Cohesity Web UI as admin/admin


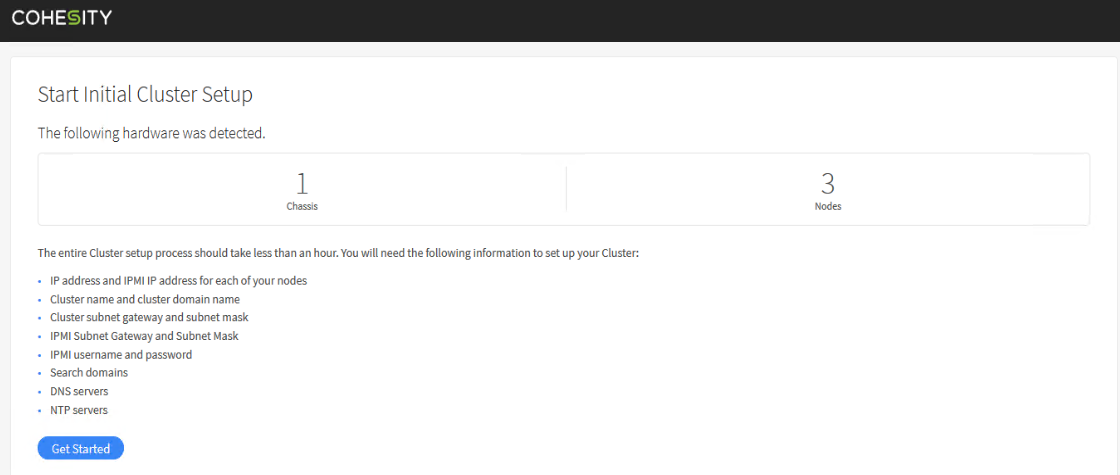
11. Follow onscreen instructions to complete initial configuration


12. Complete all the relevant information, remember that appliance has to be able to resolve its fqdn to the IP, appliance needs access to NTP servers - otherwise installation will fail


13. Wait for cluster to be configured


14. Login to Cohesity Web UI, accept the license agreement


15. Apply License Key


16. Cohesity appliance deployment is complete now.


12 February 2019

Cohesity C2605 initial setup

Easy way to deploy physical Cohesity cluster.

Remember to read installation prerequisites prior to starting an installation.

1. Rack your Cohesity, cable as in Cohesity manual and configure your switches


2. Connect Monitor to one node and check the IP


3. Configure i.e. laptop with 169.254.0.1/16 IP address and connect to the same network Cohesity is on.
4. Brows to Cohesity Node IP https://169.254.4.16


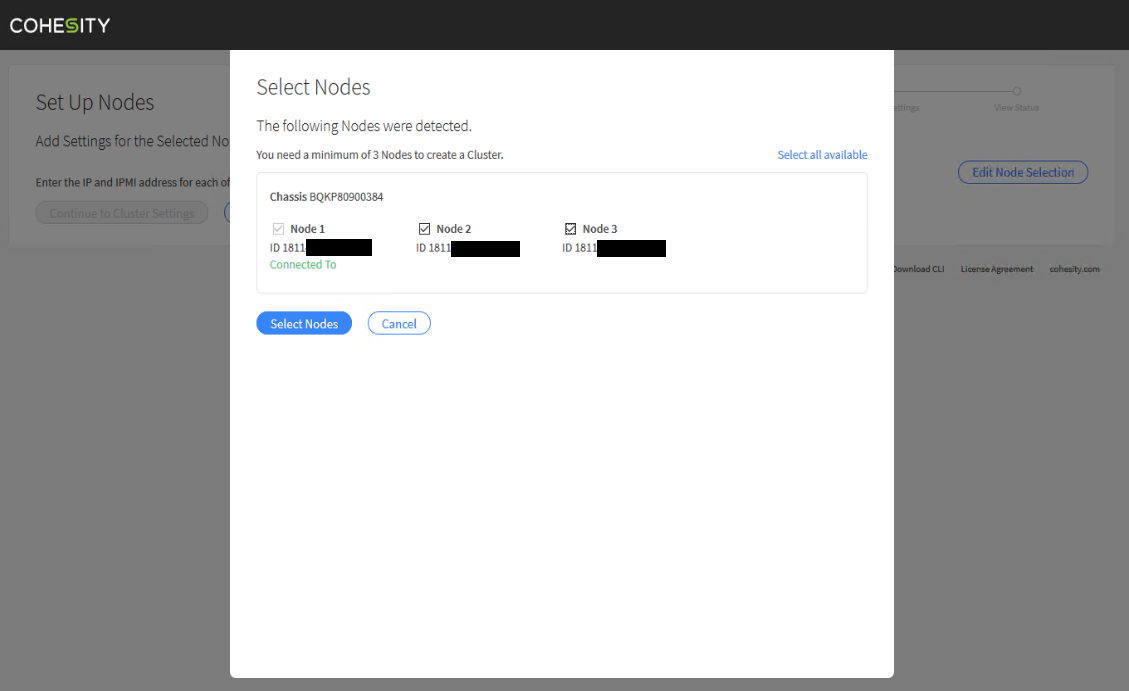
5. Choose cluster nodes (3 minimum)


6. Configure nodes IP and IPMI


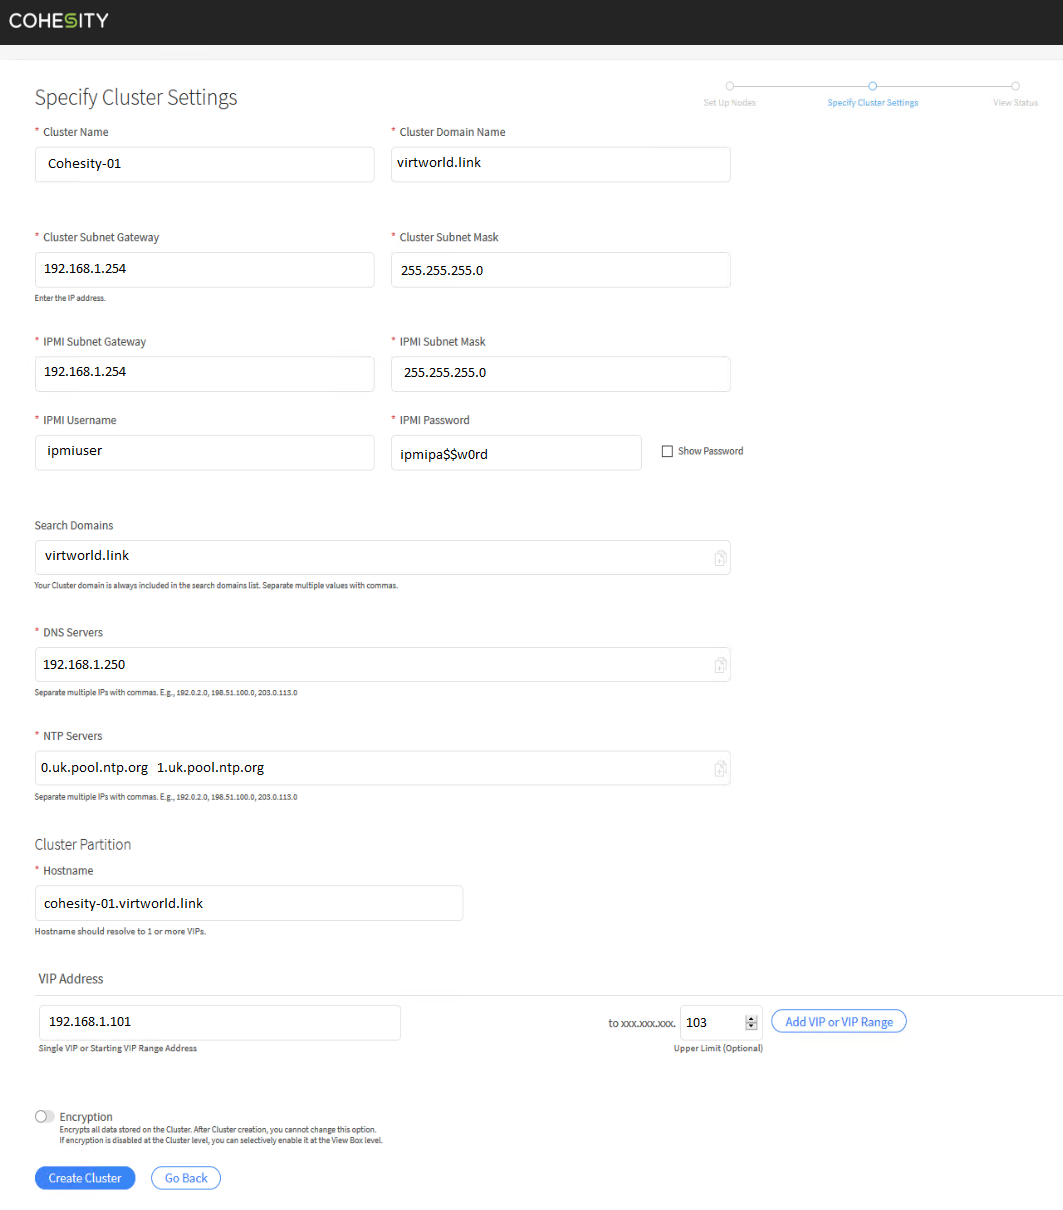
7. Configure cluster settings


For VIP Address I use one IP per node so for this cluster type Node 1 IP, then Node 3 IP - just last octet and click "Add VIP".
Remember Cluste Hostname has to be resolvable and each Node has to have access to DNS & NTP server, otherwise installation fails.

8. Click "Create Cluster", wait few minutes and Cohesity cluster should be up & running.

11 February 2019

Data Domain network speed test with iperf


If you want to test network speed between your Data Domain (i.e. to troubleshoot replication issue) use iperf tool.

Below example test speed from ddve-02 (source) to ddve-01 (destination).

For iperf to work you have to ensure the TCP port 5001 is open on destination Data Domain.

On destination Data Domain you have to start iperf as server
sysadmin@ddve-01# net iperf server

On source Data Domain start iperf as client
sysadmin@ddve-02# net iperf client 192.168.12.21 duration 60 interval 10

192.168.12.21 - destination Data Domain IP
duration 60 - test duration 60 seconds
interval 10 - report speed results every 10 seconds

Example iperf output

sysadmin@ddve-01# net iperf server
------------------------------------------------------------
Server listening on TCP port 5001
TCP window size:  256 KByte (default)
------------------------------------------------------------
[  4] local 192.168.12.21 port 5001 connected with 192.168.12.22 port 46551
[ ID] Interval       Transfer     Bandwidth
[  4]  0.0-60.0 sec   229 GBytes  32.8 Gbits/sec
^C
sysadmin@ddve-01#


sysadmin@ddve-02# net iperf client 192.168.12.21 duration 60 interval 10
------------------------------------------------------------
Client connecting to 192.168.12.21, TCP port 5001
TCP window size:  256 KByte (default)
------------------------------------------------------------
[  3] local 192.168.12.22 port 46551 connected with 192.168.12.21 port 5001
[ ID] Interval       Transfer     Bandwidth
[  3]  0.0-10.0 sec  38.7 GBytes  33.2 Gbits/sec
[  3] 10.0-20.0 sec  31.5 GBytes  27.1 Gbits/sec
[  3] 20.0-30.0 sec  39.7 GBytes  34.1 Gbits/sec
[  3] 30.0-40.0 sec  41.4 GBytes  35.6 Gbits/sec
[  3] 40.0-50.0 sec  39.9 GBytes  34.3 Gbits/sec
[  3] 50.0-60.0 sec  38.2 GBytes  32.8 Gbits/sec
[  3]  0.0-60.0 sec   229 GBytes  32.8 Gbits/sec
sysadmin@ddve-02#

09 February 2019

Avamar client installation CLI

Avamar client for Windows

C:\Avamar> msiexec.exe /qn /I “C:\Avamar\AvamarClient-windows-x86_64-7.5.100-183.msi” SERVER=”grid1.avamar.local” DOMAIN=”/clients” GROUP=”/clients/backup_policy” UICOMPONENT=1 PROGRESSBAR=false BALLOONMESSAGE=false BACKUPREMINDER=never

Register client with the grid

C:\Program Files\avs\bin>avregister.bat “grid1.avamar.local” “/clients”

Degraded VD on Avamar storage node

Troubleshooting of degraded VD on Avamar storage node

Command list:

ssh-agent bash
ssh-add /home/admin/.ssh/dpnid
status.dpn
avmaint nodelist | grep ‘nodetag\|gendesc’
mccli event show –unack
mapall –noerror –user=root ‘grep -h “MRMON151\|MRMON195\|MRMON153\|MRMON194” /var/log/messages | sort’
mapall –noerror –user=root ‘grep -i “scsi\|medium\|media\|fatal\|critical\|sense\|memory” /var/log/messages’
mapall –noerror –all hostname

Login to the affected node:
ssn –user=root 0.x
grep -h “MRMON151\|MRMON195\|MRMON153\|MRMON194” /var/log/messages | sort
avsysreport pdisk controller=0
grep -i “scsi\|medium\|media\|fatal\|critical\|sense\|memory” /var/log/messages
sudo ipmitool fru print 0

Manual Garbage Collection

Manual GC should be performed by EMC staff as by doing it you may invalidate the warranty and/ or delete backups.

Login to grid Utility Node as admin.

1. Kill any current sessions

avmaint sessions --full | grep sessionid | cut -d'”' -f2 | xargs -L1 avmaint kill

2. Stop the Backup Scheduler

dpnctl stop sched

3. Stop the Maintenance Window Schedule

dpnctl stop maint

4. Take a new checkpoint

avmaint checkpoint --ava

5. Check and wait for the completion of the checkpoint

status.dpn | grep ^Checkpoint

6. Disable the Index Cache

avmaint config --ava indexcacheallowed=2

7. Initiate a manual Garbage Collection job

avmaint garbagecollect --ava --kill=0 --maxpass=0 --refcheck=true --throttlelevel=0 --usehistory=false --maxtime=18000

8. Re-enable the Index Cache

avmaint config --ava indexcacheallowed=1

9. Start the Maintenance Window Scheduler

dpnctl start maint

10. Start the Backup Scheduler

dpnctl start sched

11. Confirm all systems are up and operational

dpnctl status all


Command list:

avmaint sessions --full | grep sessionid | cut -d'”' -f2 | xargs -L1 avmaint kill
dpnctl stop sched
dpnctl stop maint
avmaint checkpoint --ava
status.dpn | grep ^Checkpoint
avmaint config –ava indexcacheallowed=2
avmaint garbagecollect --ava --kill=0 --maxpass=0 --refcheck=true --throttlelevel=0 --usehistory=false --maxtime=18000
avmaint config --ava indexcacheallowed=1
dpnctl start maint
dpnctl start sched
dpnctl status all

Remove partial/ incomplete backup

admin@avamar:~/#: avmgr getb –path=/clients/avamar-client –incpartials –format=xml
1 Request succeeded
<?xml version=”1.0″ encoding=”UTF-8″ standalone=”yes”?>
<backuplist version=”3.0″>
<backuplistrec flags=”16777233″ labelnum=”1″ label=”STG Windows FS_with VSS_no Exc-1504327839115″ created=”1504537525″ roothash=”467534c908cb977867b75ba6eaa2a9a301356064″ totalbytes=”1803647582208.00″ ispresentbytes=”0.00″ pidnum=”3001″ percentnew=”96″ expires=”1505142325″ created_prectime=”0x1d3258f3ccc0cf2” partial=”1″ retentiontype=”none” backuptype=”Full” ddrindex=”0″ locked=”0″ direct_restore=”1″/>
</backuplist>

admin@avamar:~/#: dpnctl stop maint
dpnctl: INFO: Suspending maintenance windows scheduler…

admin@avamar:~/#: avmaint session | grep path

admin@avamar:~/#: avmaint config asynccrunching=false –ava
<?xml version=”1.0″ encoding=”UTF-8″ standalone=”yes”?>
<gsanconfig asynccrunching=”true”/>

admin@avamar:~/#: avmgr delb –path=/clients/avamar-client –incpartials –incpartial –date=0x1d3258f3ccc0cf2
1 Request succeeded

admin@avamar:~/#: avmaint config asynccrunching=true –ava
<?xml version=”1.0″ encoding=”UTF-8″ standalone=”yes”?>
<gsanconfig asynccrunching=”false”/>

admin@avamar:~/#: dpnctl start maint
dpnctl: INFO: Resuming maintenance windows scheduler…
dpnctl: INFO: maintenance windows scheduler resumed.

admin@avamar:~/#: avmgr delb –path=/clients/avamar-client –incpartials –incpartial –date=0x1d3258f3ccc0cf2
admin@avamar:~/#: avmgr getb –path=/clients/avamar-client –incpartials –format=xml
1 Request succeeded


Command list:

avmgr getb –path=/clients/avamar-client –incpartials –format=xml
dpnctl stop maint
avmaint session | grep path
avmaint config asynccrunching=false –ava
avmgr delb –path=/clients/avamar-client –incpartials –incpartial –date=0x1d3258f3ccc0cf2
avmaint config asynccrunching=true –ava
dpnctl start maint
avmgr delb –path=/clients/avamar-client –incpartials –incpartial –date=0x1d3258f3ccc0cf2
avmgr getb –path=/clients/avamar-client –incpartials –format=xml

Popular