12 May 2020

DellEMC Data Doamin - Storage enclosure numbering is not sequential

You may experience not sequential enclosure numbering when some of them are removed/ disconnected from the system. Way to resolve it is to release enclosure persistent id and restart the system.


sysadmin@dd-01# enclosure show summary

Enclosure   Model No.   Serial No.       State     OEM Name   OEM Value   Capacity

---------   ---------   --------------   -------   --------   ---------   --------

1           DD990       0F00000001       Online                           4 Slots

2           ES30        CKM00000000001   Online                           15 Slots

3           ES30        CKM00000000002   Online                           15 Slots

4           ES30        CKM00000000003   Offline                          15 Slots

5           ES30        CKM00000000004   Online                           15 Slots

6           ES30        CKM00000000005   Offline                          15 Slots

7           ES30        CKM00000000006   Online                           15 Slots

8           ES30        CKM00000000007   Offline                          15 Slots

9           ES30        CKM00000000008   Offline                          15 Slots

10          ES30        CKM00000000009   Offline                          15 Slots

11          ES30        CKM00000000010   Offline                          15 Slots

12          ES30        CKM00000000011   Offline                          15 Slots

---------   ---------   --------------   -------   --------   ---------   --------

12 enclosures present.


sysadmin@dd-01# enclosure release persistent-id all


sysadmin@dd-01# system reboot


The 'system reboot' command reboots the system. File access is

interrupted during the reboot.

        Are you sure? (yes|no) [no]: yes


ok, proceeding.


The system is going down for reboot.


Broadcast message from root (Mon Apr 27 14:05:01 2020):


The system is going down for reboot NOW!


sysadmin@dd-01# enclosure show summary

Enclosure   Model No.   Serial No.       State    OEM Name   OEM Value   Capacity

---------   ---------   --------------   ------   --------   ---------   --------

1           DD990       0F00000001       Online                          4 Slots

2           ES30        CKM00000000001   Online                          15 Slots

3           ES30        CKM00000000002   Online                          15 Slots

4           ES30        CKM00000000004   Online                          15 Slots

5           ES30        CKM00000000006   Online                          15 Slots

---------   ---------   --------------   ------   --------   ---------   --------

5 enclosures present.


DellEMC Data Domain - Resolve Disk State "Unknown"


Unknown disk are most likely just introduced to the system, you have to unfail them to make them available and then assign to appropriate tier.

sysadmin@dd-01# disk show state
Enclosure   Disk
             1  2  3  4  5  6  7  8  9  10 11 12 13 14 15
---------   ----------------------------------------------
1            .  .  .  s
2            v  v  v  v  v  v  v  v  v  v  v  v  v  v  v
3            v  v  v  v  v  v  v  v  v  v  v  v  v  v  v
4            v  v  v  v  v  v  v  v  v  v  v  v  v  v  v
5            v  v  v  v  v  v  v  v  v  v  v  v  v  U  v
---------   ----------------------------------------------

Legend   State             Count
------   ---------------   -----
.        In Use Disks      3
s        Spare Disks       1
v        Available Disks   59
U        Unknown Disks     1
------   ---------------   -----
Total 64 disks

sysadmin@dd-01# disk unfail 5.14

The 'disk unfail' command will add the disk to the active storage tier
and mark it available. Any existing data on this disk will be lost.
        Are you sure? (yes|no) [no]: yes

ok, proceeding.

sysadmin@dd-01# disk show state
Enclosure   Disk
             1  2  3  4  5  6  7  8  9  10 11 12 13 14 15
---------   ----------------------------------------------
1            .  .  .  s
2            v  v  v  v  v  v  v  v  v  v  v  v  v  v  v
3            v  v  v  v  v  v  v  v  v  v  v  v  v  v  v
4            v  v  v  v  v  v  v  v  v  v  v  v  v  v  v
5            v  v  v  v  v  v  v  v  v  v  v  v  v  v  v
---------   ----------------------------------------------

Legend   State             Count
------   ---------------   -----
.        In Use Disks      3
s        Spare Disks       1
v        Available Disks   60
------   ---------------   -----
Total 64 disks

DellEMC Data Domain - Resolve Disk State "Known"

Disk in "Known" state means that disk is part of filesystem but not all disks which create the filesystem are online.

sysadmin@dd-01# disk show state
Enclosure   Disk
             1  2  3  4  5  6  7  8  9  10 11 12 13 14 15
---------   ----------------------------------------------
1            .  .  .  s
2            K  K  K  K  K  K  K  K  v  K  K  K  K  K  K
3            K  K  K  K  K  K  K  K  K  K  K  K  K  K  v
4            K  K  K  K  K  K  K  K  K  K  K  K  K  K  v
5            K  K  K  K  K  K  K  K  K  K  K  K  K  K  v
---------   ----------------------------------------------

Legend   State             Count
------   ---------------   -----
.        In Use Disks      3
s        Spare Disks       1
v        Available Disks   4
K        Known Disks       56
------   ---------------   -----
Total 64 disks

In Known state you cannot fail/ unfail the disk

sysadmin@dd-01# disk fail 2.1


**** Disk 2.1 is not in a valid state: can neither fail nor unfail.


I have not found any procedure to resolve this issue while some disks/ enclosures are missed from filesystem.
In my situation I have to power on all disks shelves, this allowed me to destroy filesyetem.

sysadmin@dd-01# filesys status
The filesystem is disabled and shutdown.

sysadmin@dd-01# filesys destroy
The "filesys destroy" command irrevocably destroys all data in
all the MTrees, including all virtual tapes, archive units and replication contexts.
The 'filesys destroy' operation will take about 10-11 minutes.
File access is disabled during this process.
        Are you sure? (yes|no) [no]: yes

ok, proceeding.

Please enter sysadmin password to confirm 'filesys destroy':

The filesystem is already disabled.
Destroying the filesystem.

The filesystem has been destroyed.

sysadmin@dd-01# filesys status
The filesystem doesn't exist.

Then all disk changed status to "Available". 

sysadmin@dd-01# disk show state
Enclosure   Disk
             1  2  3  4  5  6  7  8  9  10 11 12 13 14 15
---------   ----------------------------------------------
1            .  .  .  s
2            v  v  v  v  v  v  v  v  v  v  v  v  v  v  s
3            v  v  v  v  v  v  v  v  v  v  v  v  v  v  s
4            v  v  v  v  v  v  v  v  v  v  v  v  v  v  s
5            v  v  v  v  v  v  v  v  v  v  v  v  v  s  v
6            v  v  v  v  v  v  v  v  v  v  v  v  v  v  s
7            v  v  v  v  v  v  v  v  v  v  v  v  v  v  s
8            v  v  v  v  v  v  v  v  v  v  v  v  v  v  s
9            v  v  v  v  v  v  v  v  v  v  v  v  s  v  v
10           v  v  v  v  v  v  v  v  v  v  v  v  v  v  s
11           v  v  v  v  v  v  v  v  v  v  v  v  v  v  s
12           v  v  v  v  v  v  v  v  v  v  v  v  v  v  s
---------   ----------------------------------------------

Legend   State             Count
------   ---------------   -----
.        In Use Disks      3
s        Spare Disks       12
v        Available Disks   154
------   ---------------   -----
Total 169 disks


At this point I was able to remove unwanted disk shelves and create new, smaller filesystem.

sysadmin@dd-01# disk show state
Enclosure   Disk
             1  2  3  4  5  6  7  8  9  10 11 12 13 14 15
---------   ----------------------------------------------
1            .  .  .  s
2            v  v  v  v  v  v  v  v  v  v  v  v  v  v  v
3            v  v  v  v  v  v  v  v  v  v  v  v  v  v  v
4            v  v  v  v  v  v  v  v  v  v  v  v  v  v  v
5            v  v  v  v  v  v  v  v  v  v  v  v  v  v  v
---------   ----------------------------------------------

Legend   State             Count
------   ---------------   -----
.        In Use Disks      3
s        Spare Disks       1
v        Available Disks   60
------   ---------------   -----
Total 64 disks


sysadmin@dd-01# filesys create
A filesystem of approximate size 129.97 TiB will be created.
        Do you want to continue? (yes|no) [yes]: yes

ok, continuing.

This will take 5 - 10 minutes.

Provisioning storage...
########################################### [100%]

Initializing filesystem...
########################################### [100%]

snapshot schedules deleted

You now have a freshly initialized filesystem.
 Enable the filesystem using 'filesys enable'.

sysadmin@dd-01# filesys enable
Please wait.....................
The filesystem is now enabled.

sysadmin@dd-01# filesys show space

Active Tier:
Resource           Size GiB   Used GiB   Avail GiB   Use%   Cleanable GiB
----------------   --------   --------   ---------   ----   -------------
/data: pre-comp           -        0.0           -      -               -
/data: post-comp   129175.9        0.0    129175.9     0%             0.0
/ddvar                308.1       20.3       272.1     7%               -
----------------   --------   --------   ---------   ----   -------------

DellEMC Data Domain - Disk state


 Disk StateDescription Action
 In Use
 The number of disks currently in use by the file system. No Action required
 Spare The number of spare disks (available to replace failed disks). No Action required
 Spare (reconstructing)  The number of disks that are in the process of data reconstruction (spare disks replacing failed disks). No Action required
 Available The number of disks that are available for allocation to an Active or DD Extended Retention storage tier.  
 Known The number of known unallocated disks. Resolve Disk State "Known"
 Unknown The number of unknown unallocated disks. Resolve Disk State "Unknown"
 Failed The number of failed disks. 
 Foreign The number of foreign disks. 
 Absent The number of absent disks. 
 Migrating The number of disks serving as the source of a storage migration. 
 Destination The number of disks serving as the destination of a storage migration. 
 Not Installed The number of empty disk slots that the system can detect. 

13 March 2019

Data Domain Mtree cannot be deleted


Sometimes Data Domain Mtree cannot be deleted i.e. due to lack of proper license,

This can be caused if you replicate VTL Mtree to Data Domain without VTL license and you can get error as below:

mtree delete /data/col1/VTL_mtree
**** MTree "/data/col1/VTL_mtree" contains a VTL Pool, cannot be deleted.

There is workaround to to resolve the issue:
1. Create empty mtree.
2. Run fastcopy to overwrite the VTL mtree with an empty mtree.
3. Restart file system.
4. Delete the VLT mtree and the empty mtree.


Example command list:

mtree create /data/col1/empty_mtree
mtree list
filesys fastcopy source /data/col1/empty_mtree destination /data/col1/VTL_mtree
mtree list
filesys restart
mtree delete /data/col1/empty_mtree
mtree delete /data/col1/VTL_mtree


Example output:

sysadmin@dd-01# mtree create /data/col1/empty_mtree
MTree "/data/col1/empty_mtree" created successfully.
Quota soft limit: none, hard limit: none(*)
 (*) Quota is disabled. Quota limits not enforced.


sysadmin@dd-01# mtree list

Name                                 Pre-Comp (GiB)   Status
----------------------------        --------------         ------
/data/col1/VTL_mtree              5860.0             RW
/data/col1/backup                           0.0             RW
/data/col1/empty_mtree                  0.0             RW
----------------------------         --------------        ------
 D    : Deleted
 Q    : Quota Defined
 RO   : Read Only
 RW   : Read Write
 RD   : Replication Destination
 RLGE : Retention-Lock Governance Enabled
 RLGD : Retention-Lock Governance Disabled
 RLCE : Retention-Lock Compliance Enabled


sysadmin@dd-01# filesys fastcopy source /data/col1/empty_mtree destination /data/col1/VTL_mtree


Destination "/data/col1/VTL_mtree" already exists.

Proceeding will overwrite its content with "/data/col1/empty_mtree".
        Are you sure? (yes|no|?) [no]: yes

ok, proceeding.


Creating snapshot "FASTCOPY-2019-03-13-04-28-17" with one-hour retention period...done

Use this snapshot to recover in case of a mistake.

(00:00) Waiting for fastcopy to complete...

Fastcopy status: fastcopy /data/col1/empty_mtree to /data/col1/VTL_mtree: deleted 1046 files, 1 directory in 1.05 seconds


sysadmin@dd-01# mtree list

Name                              Pre-Comp (GiB)   Status
----------------------------   --------------           ------
/data/col1/VTL_mtree                      0.0        RW
/data/col1/backup                              0.0       RW
/data/col1/empty_mtree                    0.0        RW
----------------------------   --------------           ------
 D    : Deleted
 Q    : Quota Defined
 RO   : Read Only
 RW   : Read Write
 RD   : Replication Destination
 RLGE : Retention-Lock Governance Enabled
 RLGD : Retention-Lock Governance Disabled
 RLCE : Retention-Lock Compliance Enabled


sysadmin@dd-01# filesys restart

This action will restart the file system.
Applications may experience interruptions
while the file system is restarted.
        Are you sure? (yes|no) [no]: yes

ok, proceeding.

Disabling filesystem:
Please wait..............
The filesystem is now disabled.
Enabling filesystem:
Please wait...............

The filesystem is now enabled.

sysadmin@dd-01# mtree delete /data/col1/empty_mtree

Deleting an MTree will destroy all data in the MTree.
If there are any NFS exports, CIFS shares, VTL tapes, DDBOOST storage-units, Replication Contexts or Physical Capacity Measurements configured for this MTree, they need to be manually removed/edited. Do you wish to continue?
        Are you sure? (yes|no) [no]: yes

ok, proceeding.

MTree "/data/col1/empty_mtree" deleted successfully.


sysadmin@dd-01# mtree delete /data/col1/VTL_mtree

Deleting an MTree will destroy all data in the MTree.
If there are any NFS exports, CIFS shares, VTL tapes, DDBOOST storage-units, Replication Contexts or Physical Capacity Measurements configured for this MTree, they need to be manually removed/edited. Do you wish to continue?
        Are you sure? (yes|no) [no]: yes

ok, proceeding.

MTree "/data/col1/VTL_mtree" deleted successfully.


sysadmin@dd-01# mtree list
Name                           Pre-Comp (GiB)   Status
----------------------------   --------------        ------
/data/col1/VTL_mtree                      0.0      D
/data/col1/backup                              0.0     RW
/data/col1/empty_mtree                    0.0     D
----------------------------   --------------        ------
 D    : Deleted
 Q    : Quota Defined
 RO   : Read Only
 RW   : Read Write
 RD   : Replication Destination
 RLGE : Retention-Lock Governance Enabled
 RLGD : Retention-Lock Governance Disabled
 RLCE : Retention-Lock Compliance Enabled

12 March 2019

Data Domain - suddenly monitoring shows disk unknown


Sometimes when you monitor data domain your monitoring software can suddenly report disk as "UNKNOWN" however data domain works as normal.
This is caused by data domain management services misbehavior.
To resolve it you should run below commands:

1. SSH to your data domain

2. Enter SE mode:

system show serialno
(make note of the serial number)
priv set se
(use the serial number as the password)

3. Run the following:

reg set config.crontab.diskinfo_reset = "*/5 * * * * root /bin/killall -9 ssm"

4. Wait for at least 10 minutes and after that time run this:

reg removekey config.crontab.diskinfo_reset

28 February 2019

Avamar - Enable Client Migration Tool

Sometimes you have to migrate clients/ backups to new Avamar grid. To enable migrate on source grid follow below procedure.


On source avamar server make below changes

admin@grid1:~/>: vi /usr/local/avamar/var/mc/server_data/prefs/mcserver.xml

find "migrate"

add line: <entry key="migrate_feature_enabled" value="true" />

example of migrate section

 <node name="migrate">
            <map>
              <entry key="migrate_feature_enabled" value="true" />
              <entry key="src_driven_migrate" value="true" />
              <entry key="migrate_enabled" value="true" />
              <entry key="clients_only_in_workorders" value="false" />
              <entry key="secured_port_offset" value="2000" />
              <entry key="migrate_sched_priority" value="0" />
              <entry key="num_members_per_workorder" value="-1" />
              <entry key="internal_accounts" value="AVI_BACKUPS,EM_BACKUPS,MC_BACKUPS,EBR_BACKUPS" />
              <entry key="encryption" value="high" />
              <entry key="base_port" value="27000" />
              <entry key="internal_account_repl_window_sec" value="300" />
              <entry key="migrate_window_hours" value="24" />
              <entry key="parent_cancel_job_priority" value="6000" />
              <entry key="migrate_adhoc_priority" value="5000" />
            </map>
          </node>

restart mcs

admin@grid1:~/>: mcserver.sh --restart

start scheduler

admin@grid1:~/>: dpnctl start sched


23 February 2019

How to decript Avamar passwords

If you forgor all your Avamar software password you can follow below steps to recover them.
This do not apply to Avamar OS passwords like root & admin.

Decript Avamar passwords

/usr/local/avamar/bin/mccipher decrypt --all
grep AP /usr/local/avamar/var/mc/server_data/prefs/mcserver.xml

root@grid-01:~/#: grep AP /usr/local/avamar/var/mc/server_data/prefs/mcserver.xml
                <entry key="backuprestoreAP" value="backuprestore1" />
                <entry key="backuponlyAP" value="backuponly1" />
                <entry key="MCUSERAP" value="MCUser1" />
                <entry key="replonlyAP" value="replonly1" />
                <entry key="restoreonlyAP" value="restoreonly1" />
                <entry key="rootAP" value="AvamarRootPassword" />
                <entry key="viewuserAP" value="viewuser1" />

Remember to encript the Avamar passwords

/usr/local/avamar/bin/mccipher encrypt --all 

14 February 2019

Upgrade Cohesity Software


1. Go to Cohesity download page and

  • Copy link to upgrade package, or
  • Download upgrade package to local hard drive


2. Login to Cohesity Web UI, go to "Admin" -> "Upgrade Cluster"


3. Click "Get New Package", then you have 2 options:

  • Provide download link to upgrade package


  • Upload upgrade package from local hard drive


Then click "Get Package and Upgrade"

4. Page will refresh automatically, you can click "Show Subtask" to monitor upgrade progress


If you upgrade single node Virtual Coheity it will be unavailable for few minutes, on multi-node clustered Cohesity, one node will be upgraded at a time and you still will be able to use it as normal.
On one point you will be logged out to to refresh the Web UI

5. Refresh web page and login to Cohesity Web UI, go to "Admin" -> "Upgrade Cluster" to confirm new software has been installed


Cohesity Virtual Edition - expand disk capacity

If you run out of space on your virtual Cohesity below are steps which allow you to extend its capacity.

1. In Cohesity Web UI you can see capacity 534.6 GB


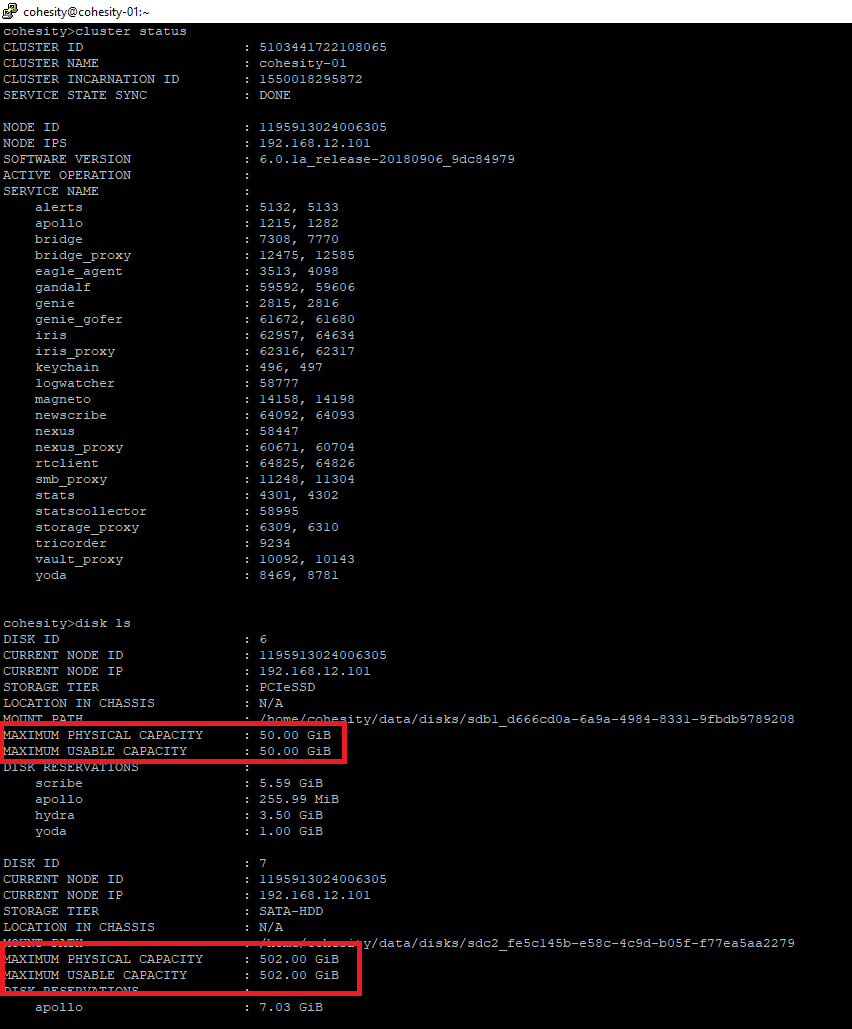
2. SSH to the Cohesity, switch to iris_cli and run: "disk ls" to determine disks size, as you can see we have 50 GB metadata disk and 502 GB data disk


3. Login to ESX or vCentre server and confirm current drives size


4. Expand "Hard Disk 2" metadata disk form 50 to 70 GB and "Hard Disk 3" data disk from 512 to 1024 GB, then restart Cohesity appliance to ensure it can properly recognize the drives new size.


5. SSH to Cohesity, switch to iris_cli, run:

  • disk ls - make note of "CURRENT NODE ID"
  • disk extend node-id=CURRENT_NODE_ID
Now wait few minutes to allow system to expand disks


6. Run "disk ls" to confirm drives have new sizes as expected


8. Run "cluster restart all-services=true" to allow Cohesity to utilize new capacity


9. While all services are restarted login to Cohesity Web UI to confirm new available capacity


Deploy Cohesity Virtual Edition


1. Login to Cohesity support portal and download OVA file


2. Deploy Cohesity OVA to your ESXi / vSphere environment


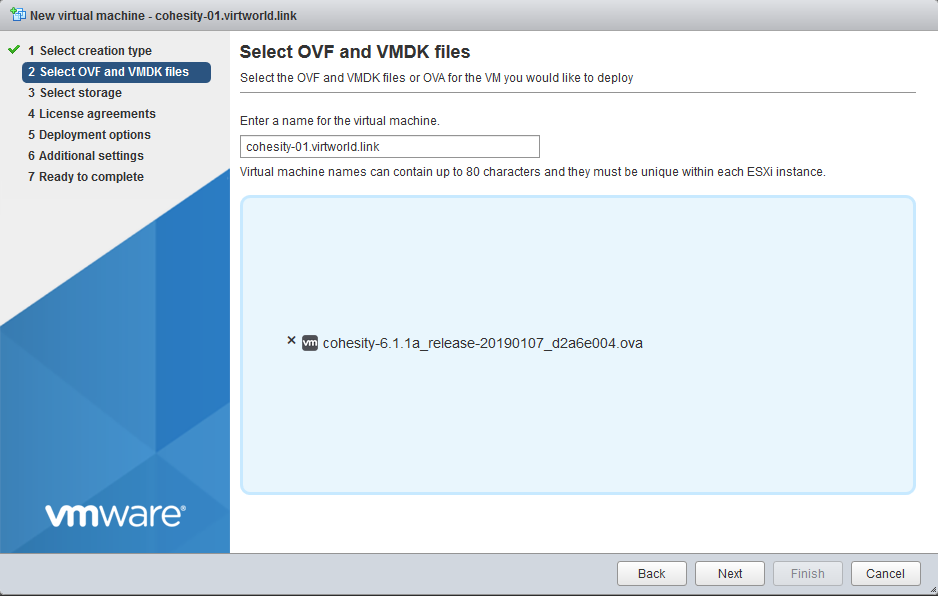
3. Give it a name and choose OVA file


4. Choose datastore for Cohesity OS drive


5. Choose network the Cohesity should be connected to


6. Configure Cohesity initial IP settings


7. Click Next to deploy Cohesity appliance

8. Edit appliance configuration and add 2 hdd, one for metadata (best on SSD datastore) and second for data (max 20 x metadata drive size)


9. If you deploy Cohesity appliance to ESXi host IPs will not be applied and you have to do it manually. Open Cohesity appliance console, login as admin/admin, you have to put the credential twice, then run below commands:

cohesity>cluster status
Error: Node having ID 1195873274425422 is not part of a cluster

cohesity> node configure-network node-ips=192.168.12.101 subnet-mask=255.255.255.0 subnet-gateway=192.168.12.1 node-ids=1195873274425422

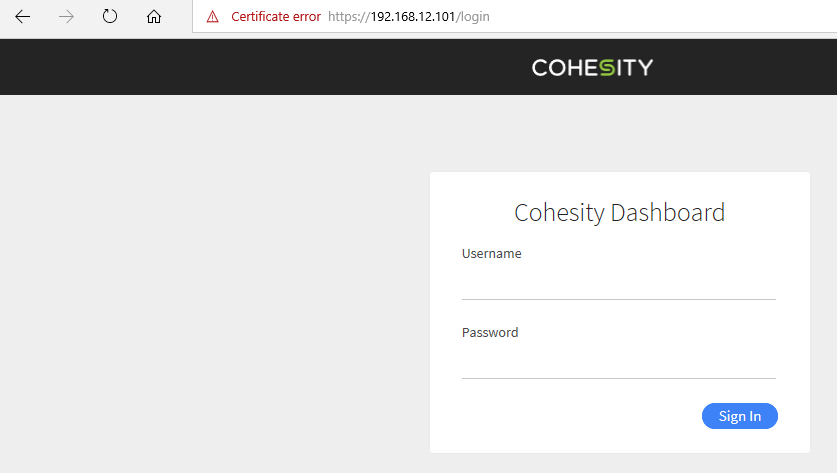
10. Login to Cohesity Web UI as admin/admin


11. Follow onscreen instructions to complete initial configuration


12. Complete all the relevant information, remember that appliance has to be able to resolve its fqdn to the IP, appliance needs access to NTP servers - otherwise installation will fail


13. Wait for cluster to be configured


14. Login to Cohesity Web UI, accept the license agreement


15. Apply License Key


16. Cohesity appliance deployment is complete now.


Popular